방법2016. 6. 3. 13:49

사내 메일 서버의 Raid Controller 가 맛이가서 H/W 교체 후 백업에서 복원하니 레퍼런스키가 일치하지 않아 7일 이후에는 동작을 중지한다는 메세지가 떴다.


국내 총판(?)인 소프트메일에 전화했더니 유료로 라이센스 갱신을 해야한다고...

아니 무슨 H/W 변경했다고 돈을 내야되냐고 물었으나 정책이 그러하니 어쩔수 없단다 ㅡㅡ

일단은 다음날 오전까지 다시 한번 알아봐주기로하고 전화를 끊은 뒤,


분명 상식적으로 해결할 수 있는 방법이 있을 것이다 라고 생각하고 구글링 해보니 아래와 같은 페이지를 찾을 수 있었다.


How to regenerate your license if (Reference key mismatch) is seen


거기다 이건 Merak 개발사인 IceWarp 의 Support 페이지.. 소프트메일 측에서 이런 방법이 있는데도 부당한 이익을 취하기 위해 그런 말을 한것으로 보이진 않고, 제대로 내용을 모르고 있다고 생각한다.


쨌든, 동일 문제로 괜한 돈 쓰시는 분들이 없길 바라며..


나의 경우는 Version 9 대 였기 때문에, VERSION 9, 10, 11 부분을 참고했다.

ONLINE 쪽 방법은 뭔가 제대로 되지 않는 듯 했고,

OFFLINE 방법으로 해결했다. 설명과 정확히 일치하지 않아 보충 설명한다.

(진행전에 메라크 관리 도구 메뉴-도움말-라이선스 다이얼로그의 라이선스 정보를 확인 후 진행하자)


1. 라이센스 페이지로 이동


2. Order ID (구매번호) 를 입력하고 검색


3. Order Information 이 보이면 상단에 On-Line Retrieval 부분에서 Retrieve 를 License 로 선택, 선택 후 표시되는 Reference Key 부분에 라이선스 다이얼로그 상의 서버 레퍼런스 키를 붙여넣고 Submit


4. 잠시간의 시간 소요 후 표시되는 라이센스 데이터를 Copy


5. 라이선스 다이얼로그에서 라이선스 키 입력 버튼을 눌러서 Paste-확인


6. 짜잔, 정상 상태로 변경되었다!

Posted by cloim
방법2014. 4. 10. 09:03

Remove the Layout/DataWindow key from the HKCU/Software/Sybase/PowerBuilder/<version> key in the registry


Posted by cloim
방법2012. 9. 21. 17:47

MS Office 리본 메뉴에 사용자 정의 매크로를 설정하는 방법에 대해 알아본다


1. 매크로 작성하기

엑셀 이든 파워포인트든 각 프로그램에서 원하는 기능을 구현한 매크로를 모듈 형태로 작성한다. 다 작성되고 나면 임의의 이름으로 원하는 곳에 '다른이름으로 저장'하며 이때 파일 타입은 '매크로 사용 OO (엑셀은 .xlsm, 파워포인트는 .pptm)' 으로 한다.


2. Custom UI Editor For Microsoft Office

Custom UI Editor 는 MS Office 리본 메뉴에 사용자 정의 UI 를 구성할 수 있도록 해주는 툴이다. 툴을 설치-실행하여 1 에서 작성한 파일을 열면 트리뷰에 오픈한 파일이 보인다. 

상단 메뉴 중 Insert - Office XXXX Custom UI Part 를 선택하면 트리뷰의 파일 하위에 customUI.xml 이 생긴걸 확인 할 수 있다. 이 파일이 우리가 원하는 대로 UI 를 구성할 xml 파일이다. 친절하게도 맨땅에 헤딩할 필요 없이 template 을 사용할 수 있는데 상단 메뉴 의 Insert - Sample XML - A custom Tab (혹은 적절한 다른 것) 을 선택한다. template 을 지정하면 코드뷰에 xml 소스가 표시되며 이제 원하는대로 xml 을 수정-저장 하면 된다.

일반적으로 수정할 프로퍼티는 다음과 같다

id : 개체 식별자                                        label : 표시명

size : 버튼 크기 (large, normal)                  onAction : 실행할 메소드                    image : 버튼 이미지

저장 후 해당 파일을 다시 열어보면 리본 메뉴에 작업한 메뉴가 표시되는 것을 확인할 수 있다.


3. 추가기능으로 설정하기

이제 오피스 프로그램을 실행하면 어떤 문서를 열든 해당 메뉴가 표시되도록 할 차례다.

이것은 '추가기능' 추가로 해결할 수 있다. 2 단계 까지 완료한 파일을 적당한 위치에 '다른 이름으로 저장' 하여 '추가기능 타입 (파워포인트의 경우 .ppam)' 으로 저장한다. 

* 추가기능 타입을 선택하면 자동으로 경로가 'C:\Users\사용자명\AppData\Roaming\Microsoft\AddIns' 로 지정되므로 저장되는 경로에 주의해야 한다.

엑셀 혹은 파워포인트 매뉴에서 파일-옵션-추가기능을 선택한 뒤 하단의 관리 콤보박스에서 '엑셀 혹은 파워포인트 추가기능' 를 선택한 뒤 옆의 '이동' 버튼을 누른다. 추가기능 관리 창이 뜨는데 '새로설치' 버튼을 눌러 추가기능 타입으로 저장한 파일을 지정한다. 목록에 해당 파일명이 뜨고 체크박스에 체크가 되어있으면 다 완료되었다.

Posted by cloim
방법2012. 9. 21. 10:14

defaults write com.apple.frameworks.diskimages skip-verify true

Posted by cloim
방법2011. 10. 10. 10:15

Finder 에서 폴더를 상위에 정렬하기

Finder 를 사용하다 보면 Windows 처럼 폴더가 맨 위에 정렬되었으면 하고 생각되는 때가 있다.

이럴 땐 아래와 같이!


OSX Lion

1. 터미널에서

plutil -convert xml1 /Users/계정명/Desktop/InfoPlist.strings


2. 바탕화면에 생긴 InfoPlist.strings 를 텍스트 편집기로 열어서 <string>폴더</string> 을 <string> 폴더</string> 과 같이 수정-저장한다 (폴더 혹은 Folder 라는 글자 앞에 공백 하나를 두어 최상위에 정렬되게 하는 원리!)


3. 다시 터미널에서

plutil -convert binary1 /Users/계정명/Desktop/InfoPlist.strings


4. 바탕화면의 해당 파일을 /System/Library/CoreServices/Finder.app/Contents/Resources/ko.lproj/InfoPlist.strings 파일과 대치 (덮어쓰기)


5. Option + 우클릭으로 Finder 를 재시작


Snow Leopard

1. 터미널에서

sudo vi /System/Library/CoreServices/Finder.app/Contents/Resources/ko.lproj/InfoPlist.strings


2. vi 편집 화면이 뜨면 내용 중 "Folder" = "폴더"; 라고 써있는 내용을 "Folder" = " 폴더"; 로 수정 (역시 폴더 앞에 공백 하나를 두어 최상위에 정렬되게 하는 것)


3. :wq 명령어로 저장


4. Option + 우클릭으로 Finder 를 재시작


Finder 에서 탭을 쓰자

TotalFinder 라는 프로그램이 있다. 유료 프로그램이니 아래의 제작사 홈페이지에 들어가서 14일 Trial 버전을 사용해 본 뒤 괜찮다 싶다면 구매해 사용한다.


http://totalfinder.binaryage.com/


정말 편하다!!


단순히 탭만 생기는게 아니라 편리한 여러가지 기능이 지원된다!

Posted by cloim
방법2011. 7. 14. 17:17

After several users reported in previous post about USB mouse stopped or stuck in Mac OS X Snow Leopard after 10.6.6 update in VMware.  There are few extra strings suggested to add in Virtual machine’s configuration file, but it did not work.  This guide shows how to fix when USB mouse stopped working after Snow Leopard 10.6.6 software automatic or manual update in VMware workstation/Player.

The reason for not responding USB mouse is, 10.6.6 update replaces the IOUSBFamily.kext and  IOUSBMassStorageClass.kext in system. These new kext files causing the issue on hackintosh methods. We need to replace these files to older version after 10.6.6 update before restart the system.

This can be done in two methods.  Whatever you do, make sure to do it before restart the Snow leopard virtual machine after 10.6.6 update.

First Method – Manually Backup and Restore

After you installed Snow leopard freshly from this method or with pre installed image as mentioned here, copy (backup) these two IOUSBFamily.kext and  IOUSBMassStorageClass.kext files from /System/Library/Extensions to some other folder. Make sure this time your USB mouse, storage and other devices are working fine with these file versions.

Now, run the software update to 10.6.6. When it prompts for restart, DO NOT RESTART.  Copy these two files from earlier location and replace (Paste) them to /System/Library/Extensions.

I always suggest taking a snapshot in VMware or taking a system backup in Mac Time Machine. Now restart the virtual machine. I’m sure you will not have USB mouse not working problem anymore in SL 10.6.6 now.

The latest 10.6.6 update installed following version of IOUSBFamily.kext.
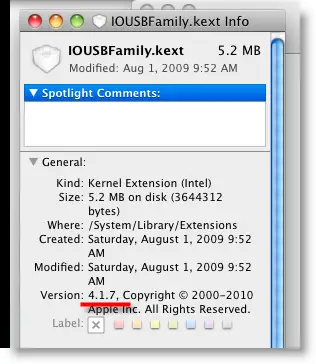
USB Mouse Stopped Working After Snow Leopard 10.6.6 Update in VMware

I replaced this file with older version of IOUSBFamily.kext which came with 10.6.3 (My USB mouse was working fine that time)
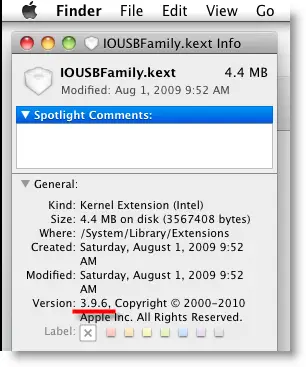
I did the similar step to IOUSBMassStorageClass.kext too before restart the system.

Second Method – Install from Package

If you are not comfortable with first method on finding, copying and restoring these files, then this installation package will do the job for you. This method replaces only IOUSBFamily.kext file to earlier version of 10.6.

Download this package here.

Before start the software update, transfer this file to Snow Leopard virtual machine or download it inside VM.  Do the software update to 10.6.6 and DO NOT RESTART now.

Run the IOUSBFamily-378.pkg package. Installation steps are very straight forward.
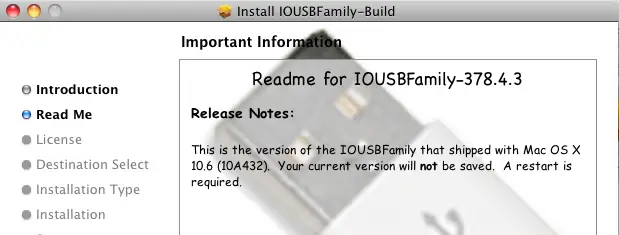
Restart the system after this installation.

The IOUSBFamily-378.pkg replaced the IOUSBFamily.kext to following version.
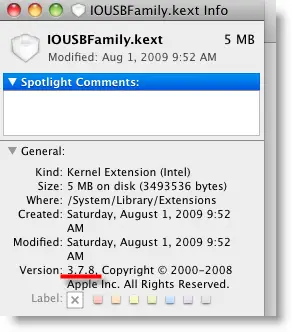
desktop virtualization software

This version is also helping to solve USB mouse issue after 10.6.6 update in VMware.

What to do if you already updated?

Unfortunately, I don’t have correct solution for this. Try below two methods.

1) Restore to previous Snapshot.

This is a solid fix. If you have a snapshot before updating, while USB devices working properly, then restore to that. Later, update to 10.6.6 and replace USB kexts files.

2) Start with –f option.

I’m not sure with this method. In case you don’t have snapshot, then start the Mac VM with –f option.

Press F8 in first Darwin boot black screen which will take to next screen where you can start the Snow leopard with extra switches. Type –f and press ENTER.
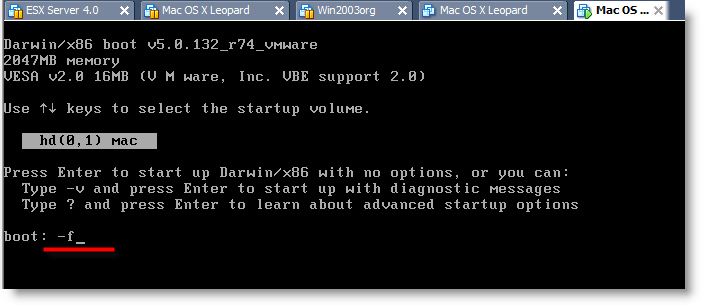
desktop virtualization software

Most of the time this will bring USB option again. Install the package or replace kexts files mentioned earlier and restart VM.

I’m sure one of above steps will be helpful to fix USB mouse problem in VMware Snow Leopard after 10.6.6 update.

I highly expect your comments on successful or failure outcome by these steps. Subscribe to our feeds or newsletter to stay tuned with Sysprobs for more hackintosh on desktop virtualization software tips.

Have fun.

Posted by cloim
방법2011. 7. 14. 17:15
defaults write com.apple.frameworks.diskimages skip-verify true


Posted by cloim
방법2011. 3. 8. 20:59

Windows 에서

  1. iTunes 종료
  2. iTunesPrefs.xml 파일을 텍스트 에디터로 오픈 (보통 C:\Documents and Settings\사용자명\Application Data\Apple Computer\iTunes, Vista 나 7 은 C:\Users\사용자명\AppData\Roaming\Apple Computer\iTunes)
  3. <key>User Preferences</key>
    <dict>
    부분을 찾는다.
  4. 바로 아랫줄에
    <key>allow-half-stars</key>
    <data>
    dHJ1ZQ==
    </data>
    라고 입력 후 저장
  5. iTunes 실행하여 확인


Mac 에서

  1. iTunes 종료
  2. Terminal 을 실행하여 아래의 명령어 실행
    defaults write com.apple.iTunes allow-half-stars –bool TRUE
  3. iTunes 실행하여 확인
Posted by cloim
방법2011. 3. 8. 19:24

명령어가 있는지 확인하는 법은 아래와 같다

$ which make

/usr/bin/make

Xcode 를 설치했다면 Xcode 에 포함되어있는 UNIX Development 를 설치하면 된다.

Xcode 를 설치하지 않았다면 Xcode 를 설치하면서 위의 패키지를 함께 설치한다.

Posted by cloim
방법2011. 2. 19. 10:28


iTunes를 사용하다 보면 각 라이브러리의 태그 정리가 얼마나 중요한지 깨닫게 된다.

그래서 틈 날때마다 제대로 태그 정리를 해주고 있는데

중요한건, 태그 정리의 기준이 지극히 주관적이다 보니 때에 따라 기준이 바뀌면 난감해 질 때가 있는거다.


오늘도 발매일 태그를 넣어주느라 잔뜩 고생했는데,

한참 MP3Tag 로 태그 정리 후 보니 아뿔사. 이미 라이브러리에 추가되어 있는 음악들의 태그가

그대로 인것이다.

iTunes 외에 다른 툴을 이용해 MP3 파일의 태그를 수정한 경우 바로바로 반영이 되지 않으니

업데이트를 해주려면 라이브러리에서 삭제 후 다시 추가 하면 되겠지만


그렇게 되면 내가 한점 한점 매겨놓은 별점과 플레이 카운트는 어쩔꺼냔 말이다 -_-


구글신께 물어보니 아니나 다를까 방법이 있었다.

Apple 에서 Windows 를 위해 COM SDK 를 공개해놓고 있었던것.

부랴부랴 AutoIt 으로 라이브러리 중에 음악에 한해서 정보(태그)를 업데이트하는 스크립트를 짰다.


혹시나 필요한 사람이 있을까봐 공유한다.

사용법은 별게 없다. 그냥 실행하면 된다 -_-

단, iTunes 가 설치되어 있는 PC 에서 (당연하지)
Posted by cloim